最近给公司系统做了审计日志功能,在开发时用到Spring AOP做功能的织入,用SpEL 表达格式化日志的描述,使用Mybatis-plus做条件与分页查询,前端简单使用了Boostrap-table做查询展示及多种格式的日志导出,在此做个流程分享。
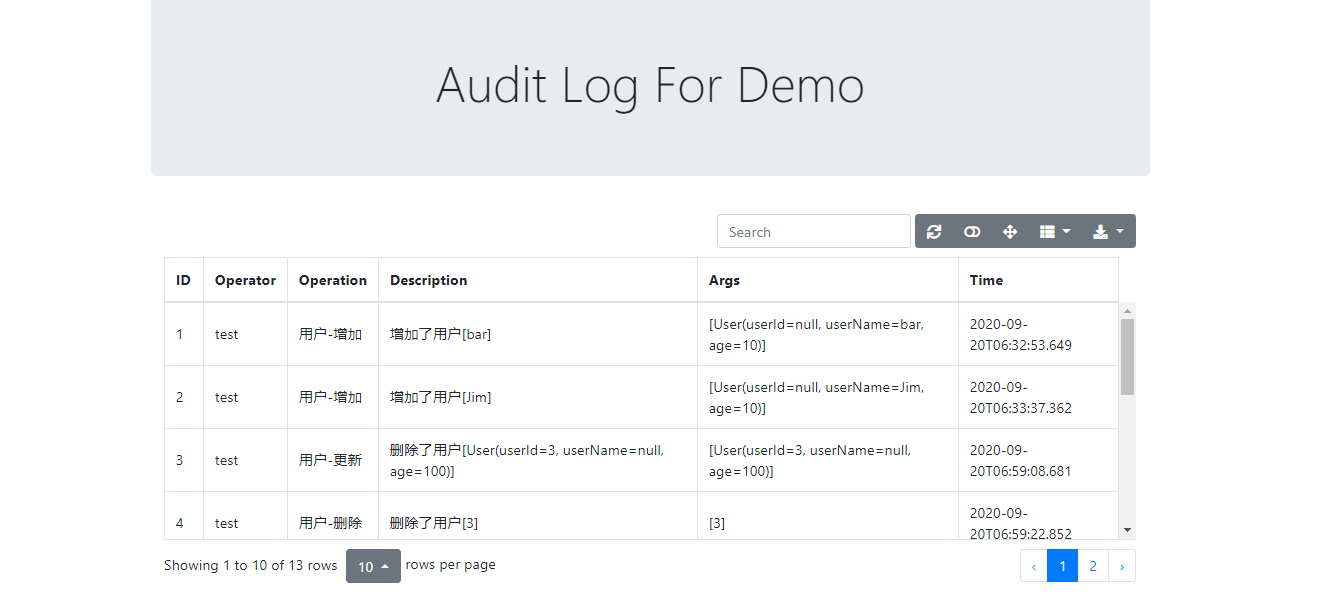
最终效果

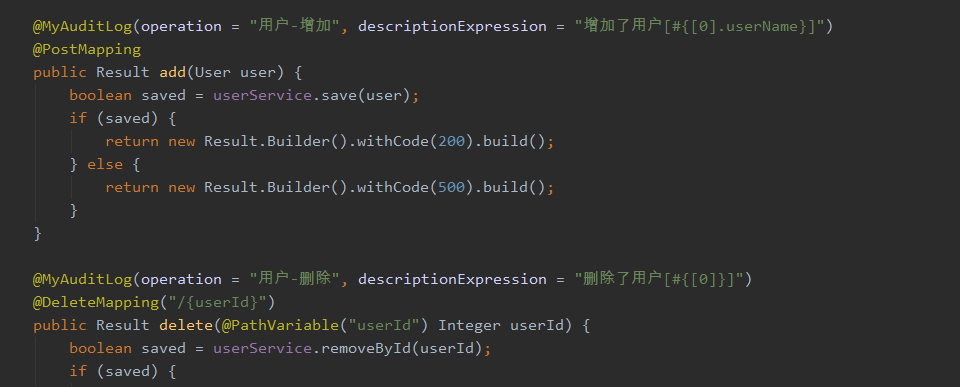
只需要在需要记录的日志的方法上加上注解就可以,注解很简单只需要两个参数,其中一个就是日志描述的表达式,可以把方法的参数格式化到描述里去,得到一个易读懂的日志信息。

从图上所看到,日志里已经包含日志该有的信息字段,并实现了分页与简单的导出功能。
后端开发
日志实体定义
1
2
3
4
5
6
7
8
9
public class AuditLog implements Serializable {
    private Long logId;
    private String operator;
    private String operation
    private String description;
    private String args;
    private LocalDateTime logTime;
 	...
 }
这是日志的主要需要记录的信息
使用自定义注解织入日志逻辑
加入SpringAop 依赖
1
2
3
4
<dependency>
	<groupId>org.springframework.boot</groupId>
	<artifactId>spring-boot-starter-aop</artifactId>
</dependency>
自定义注解
1
2
3
4
5
6
@Target(ElementType.METHOD)
@Retention(RetentionPolicy.RUNTIME)
public @interface MyAuditLog {
    String operation();
    String descriptionExpression();
}
由两个参数组成,一个操作的名称这个参数最好唯一,另一个是描述的表达式用于后面把参数格式化成易读的描述。
织入逻辑
1
2
3
4
5
6
7
8
9
10
11
12
13
14
15
16
17
18
19
20
21
22
23
24
25
26
27
28
29
30
31
32
33
34
35
36
37
38
39
40
41
42
43
44
45
46
@Aspect
@Component
public class AuditLogAspect {
    private Logger logger = LoggerFactory.getLogger(AuditLogAspect.class);

    private IAuditLogService auditLogService;

    public AuditLogAspect(IAuditLogService auditLogService) {
        this.auditLogService = auditLogService;
    }

    @Around("@annotation(MyAuditLog)")
    public Object process(ProceedingJoinPoint point) throws Throwable {
        try {
            saveAuditLog(point);
        } catch (Exception e) {
            logger.error(e.getMessage(), e);
        }
        return point.proceed();
    }

    private void saveAuditLog(ProceedingJoinPoint point) {
        Object[] args = point.getArgs();
        MyAuditLog myAuditLog = ((MethodSignature) point.getSignature()).getMethod().getAnnotation(MyAuditLog.class);
        String operation = myAuditLog.operation();
        String descriptionExpression = myAuditLog.descriptionExpression();
        //格式化描述表达式得到易读的描述
        String description = parseDescriptionExpression(args, descriptionExpression);

        AuditLog auditLog = new AuditLog.Builder()
                .withOperator("test")
                .withOperation(operation)
                .withDescription(description)
                .withArgs(Arrays.toString(args))
                .withLogTime(LocalDateTime.now())
                .build();

        auditLogService.save(auditLog);
    }

    private String parseDescriptionExpression(Object[] args, String descriptionExpression) {
        SpelExpressionParser spelExpressionParser = new SpelExpressionParser();
        Expression expression = spelExpressionParser.parseExpression(descriptionExpression, new TemplateParserContext());
        return expression.getValue(new StandardEvaluationContext(args), String.class);
    }
}
上面这个核心的AOP织入逻辑类,做了的事情也很简单,配置到需要拦截的方法,拿到注解的信息,然后可以结合方法的参数进行格式化得到易读的描述,最好构建实体类并持久化到数据库。
注解使用说明
1
2
3
4
5
6
7
8
9
10
@MyAuditLog(operation = "用户-增加", descriptionExpression = "增加了用户[#{[0].userName}]")
    @PostMapping
    public Result add(User user) {
        boolean saved = userService.save(user);
        if (saved) {
            return new Result.Builder().withCode(200).build();
        } else {
            return new Result.Builder().withCode(500).build();
        }
    }
descriptionExpression 这个写法就是要引用参数变量是要使用 #{} 然后 [] 表示是这方法的参数数组使用数字下标来表示第几个参数,如果代码里的 add 方法里的 User 参数就可以使用 [0] 来表示,后面就可以使用 . 来引用里的属性,或更牛的可以调用里面的方法 如这样写 ${[0].toString()} 就是表示直接调用了 User 对象 方法,所以就会相当灵活了。
前端开发
控制器开发
1
2
3
4
5
6
7
8
9
10
11
12
13
14
15
16
17
18
19
@RestController
@RequestMapping("/auditLog")
public class AuditLogController {

    private IAuditLogService auditLogService;

    public AuditLogController(IAuditLogService auditLogService) {
        this.auditLogService = auditLogService;
    }

    @GetMapping
    public PageAdapter list(int offset, int limit) {
        Page<AuditLog> auditLogPage = new Page<>();
        auditLogPage.setSize(limit);
        auditLogPage.setCurrent((offset / limit) + 1);
        auditLogPage.setSearchCount(true);
        return new PageAdapter(auditLogService.page(auditLogPage, new QueryWrapper<>()));
    }
}
这个控制器很简单,只是对Mybatis-plus里的分页信息做了一些适配,因为前端使用的bootstrap-table插件所使用的字段信息存在一些差异,所以就简单做一个适配。
前面页面
1
2
3
4
5
6
7
8
9
10
11
12
13
14
15
16
17
18
19
20
21
22
23
24
25
26
27
28
29
30
31
32
33
34
35
36
37
38
39
40
41
42
43
44
45
46
47
48
49
50
51
52
53
54
55
56
57
58
59
60
61
62
63
64
65
66
67
68
69
<!doctype html>
<html lang="en">
<head>
    <!-- Required meta tags -->
    <meta charset="utf-8">
    <meta name="viewport" content="width=device-width, initial-scale=1, shrink-to-fit=no">
    <title>Audit Log</title>
    <link rel="stylesheet" href="https://kit-free.fontawesome.com/releases/latest/css/free.min.css">
    <link rel="stylesheet" href="https://stackpath.bootstrapcdn.com/bootstrap/4.3.1/css/bootstrap.min.css" integrity="sha384-ggOyR0iXCbMQv3Xipma34MD+dH/1fQ784/j6cY/iJTQUOhcWr7x9JvoRxT2MZw1T" crossorigin="anonymous">
    <link rel="stylesheet" href="https://unpkg.com/bootstrap-table@1.18.0/dist/bootstrap-table.min.css">
</head>
<body>
<div class="container">
    <div class="jumbotron">
        <h1 class="display-4 text-center">Audit Log For Demo</h1>
    </div>

    <div class="container">
        <table
                id="table"
                data-toggle="table"
                data-height="430",
                data-show-refresh="true"
                data-show-toggle="true",
                data-search="true"
                data-show-fullscreen="true",
                data-show-columns="true"
                data-show-columns-toggle-all="true"
                data-ajax="ajaxRequest"
                data-side-pagination="server"
                data-show-export="true"
                data-pagination="true">
            <thead>
            <tr>
                <th data-field="logId">ID</th>
                <th data-field="operator">Operator</th>
                <th data-field="operation">Operation</th>
                <th data-field="description">Description</th>
                <th data-field="args">Args</th>
                <th data-field="logTime">Time</th>
            </tr>
            </thead>
        </table>
    </div>

</div>

<script src="https://cdnjs.cloudflare.com/ajax/libs/jquery/3.5.1/jquery.min.js" integrity="sha512-bLT0Qm9VnAYZDflyKcBaQ2gg0hSYNQrJ8RilYldYQ1FxQYoCLtUjuuRuZo+fjqhx/qtq/1itJ0C2ejDxltZVFg==" crossorigin="anonymous"></script>
<script src="https://cdnjs.cloudflare.com/ajax/libs/popper.js/1.14.7/umd/popper.min.js" integrity="sha384-UO2eT0CpHqdSJQ6hJty5KVphtPhzWj9WO1clHTMGa3JDZwrnQq4sF86dIHNDz0W1" crossorigin="anonymous"></script>
<script src="https://stackpath.bootstrapcdn.com/bootstrap/4.3.1/js/bootstrap.min.js" integrity="sha384-JjSmVgyd0p3pXB1rRibZUAYoIIy6OrQ6VrjIEaFf/nJGzIxFDsf4x0xIM+B07jRM" crossorigin="anonymous"></script>
<script src="https://unpkg.com/bootstrap-table@1.18.0/dist/bootstrap-table.min.js"></script>
<script src="https://unpkg.com/bootstrap-table@1.18.0/dist/extensions/export/bootstrap-table-export.min.js"></script>
<script src="https://unpkg.com/tableexport.jquery.plugin/tableExport.min.js"></script>


<script src="https://unpkg.com/tableexport.jquery.plugin/libs/jsPDF/jspdf.min.js"></script>
<script src="https://unpkg.com/tableexport.jquery.plugin/libs/jsPDF-AutoTable/jspdf.plugin.autotable.js"></script>

<script>
    // your custom ajax request here
    function ajaxRequest(params) {
        var url = '/auditLog'
        $.get(url + '?' + $.param(params.data)).then(function (res) {
            params.success(res)
        })
    }
</script>
</body>
</html>
页面里就使用了bootstrap-table的插件做了一个字段的映射及表格的配置,然后就可以完美呈现数据内容了。
总结
整体做出来不难,就是把融合几个组件的使用,使用AOP可以在不改原来的业务逻辑的代码,轻松优雅地给实现了,但是有一些需求是记录操作的前后的值的,针对这样的需求可以通过改造方法,让方法里参数列表里含有有旧值与旧值 这样就可以使用表达式来把前后的值显示出来。
参考:
工程全部代码:https://github.com/helloworld28/audit-log-demo
Bootstrap-table:https://examples.bootstrap-table.com/#welcome.html#view-source